Product code
A40517
Name of the product
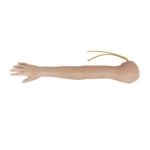
Multifunctional Intravenous (IV) Injection Training Arm Model

Product description
This model is the size of a real adult arm and is designed to help the venipuncture and injection practice to be performed professionally. Antecubital blood collection, antecubital injection, antecubital blood transfusion and deltoid intramuscular injection.
SETUP
- Take the handle and spare parts out of the box.
- Turn the screw so that the shipping stand stands properly.
- Attach two rubber tubing clamps at both ends of the vessel so that it passes through the clamp. Attach one end to the chamber and connect the other to the blood transfusion set.
- Hang the transport tube on the shipping stand.
- Use red ink instead of blood.
AREA OF USE
Antecubital Area Phlebotomization
- Inject 200-300 ml of blood into the vein through the end of the tube connected with the blood transfusion set. When the tube is full, plug the other end of the tube attached to the chamber to prevent blood from spilling over.
- Sterilize the upper arm skin and connect the rubber homeostasis tube approximately halfway to the upper arm.
- Identify the appropriate vascular access and take a blood sample with a 10 ml needle.
Blood Collection from the Antecubital Area
- Inject 200-300 ml of blood into the vein through the end of the tube connected with the blood transfusion set. When the tube is full, plug the other end of the tube attached to the chamber to prevent blood from spilling over.
- Sterilize the upper arm skin and connect the rubber homeostasis tube approximately halfway to the upper arm.
- Inject a 30 ml or 50 ml needle filled with water that looks like liquid medicine. When the needle shows red fluid, loosen the tube on the upper arm, plug the tube into the tube connected to the transport set, gently inject and allow the fluid to pass through the vasculature and pour out from the end of the tube attached to the chamber and finally into the chamber.
Blood Transfusion from the Antecubital Region
- Inject 200-300 ml of blood into the vein through the end of the tube connected with the blood transfusion set. When the tube is full, plug the other end of the tube attached to the chamber to prevent blood from spilling over.
- Hang the transport tube on the shipping stand. Then connect it to the vascular transplant device.
- Sterilize the upper arm skin and connect the rubber homeostasis tube approximately halfway to the upper arm.
- Determine the proper vein, loosen the pipe when the red liquid appears. Adjust the blood transfer rate, let the blood flow through the vascular system and pour into the chamber through the end of the attached tube.
Transplant from the Antecubital Area
- Inject 200-300 ml of blood into the vein through the end of the tube connected with the blood transfusion set. When the tube is full, plug the other end of the tube attached to the chamber to prevent blood from spilling over.
- Hang the transport tube on the shipping stand. Then connect it to the vascular transplant device.
- Sterilize the upper arm skin and connect the rubber homeostasis tube approximately halfway to the upper arm.
- Identify the appropriate vein. When the liquid appears, loosen the tube and clamp the end of the tube connected to the transport set. Open the clamp on the other end of the tube, then adjust the fluid delivery rate. Allow the fluid to flow through the vasculature and drain out of the end of the tube attached to the reservoir.
Injection from the Shoulder
- Use a 5 ml or 10 ml needle to draw fluid.
- Choose a suitable vein in the shoulder and sterilize the skin.
- Apply the needle to the vein and slowly draw fluid.
LEATHER AND VESSEL REPLACEMENT
- Lift the skin, cut off the old skin with a sharp knife.
- Protect the skin and replace veins.
- Wash the inside of the leather with liquid detergent to allow the liquid to drain between the fingers.
- Start with the top of the arm and gently pull the skin down from the arm. Do not let the skin roll so that it does not become entangled. The skeleton will be detached from the skin.
- Clean the adhesive and remove the pipe in the beam path.
- Wash and dry the vein grooves, clean with alcohol.
- Insert new veins in the troughs and apply glue where needed.
- Foam the arm beam with liquid soap. Dry the arm skin with a dryer before placing the beam.
- Thread the hand into the skin and run the skin through the fingers as if wearing gloves. Finally, cover the bowstring with arm skin.
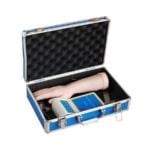
PACKAGE INCLUDED
- 1pc x Arm Model
- 1x x 5 ml Needle
- 1x Disclosure Document
- 1pcxLuxury Portable Bag
MAINTENANCE
Clean with mild soapy water. Do not immerse the handle in cleaning liquid or water.
Just clean the surface. Keep away from staining products such as felt-tip pens, ink pens, acetone, iodine.
To ensure longevity, the model should be cleaned and regularly reviewed after each training session.
All model and other spare parts should be dried and left in the open air before storage, and disinfected if necessary.
The model should be properly stored between training sessions.
PACKING DIMENSIONS
77x16x18 cm
WEIGHT
- Gross: 3 kg
- Net: 2 kg