Product code
A40515
Name of the product
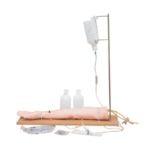
Intravenous (IV) Injection Training Hand Model

Product description
Consisting of simulated veins from the arm and including cephalic and basilic veins, this model is a widely used educational tool in clinical education.
TAKING A BLOOD SAMPLE
Attach the two clamps to the two rubber pipes separately. Start the infusion (synthetic blood) through the venous system without any air bubbles by attaching one of the tubing to the IV bag. Place the other tube in a bowl or beaker. The venous system is now pressurized and full. Close the bottom pipe. Usually the arm skin is disinfected. Identify the appropriate vein and collect 2 ml of synthetic blood with a 10 ml needle.
INJECTION OR INFUSION
Usually, cephalic and basilic veins are chosen to practice venous injection and infusion skills.
Attach the two clamps separately to the two rubber tubes. Start the infusion (clean water) through the venous system without any air bubbles by attaching one of the tubing to the IV bag. Place the other tube in a bowl or bowl. The venous system is now pressurized and full. Close the bottom pipe. Usually the arm skin is disinfected.
Injection: Identify a suitable vein. Put the index and middle finger of your left hand on the vein. Hold the needle (50 cc, filled with liquid) with your right hand and push it into the vein (vertically or at a 40 degree angle). If blood returns, close the upper tube and loosen the lower rubber tube clamp. Secure the needle with one hand and quickly press the needle plug. Allow fluid to circulate through the venous system until it reaches the container or beaker. When the injection is finished, remove the needle.
Intravenous Infusion: Prepare another IV bag filled with clean water. Attach a clamp to the IV tube. Push the infusion needle into the vein. If blood returns, loosen the clamp of the IV tube and adjust the flow rate. Allow the liquid to circulate through the venous system until it reaches the container or beaker and secure the needle properly.
BLOOD TRANSFUSION
Attach the two clamps separately to the two rubber tubes. Start the infusion (synthetic blood) through the venous system without any air bubbles by attaching one of the tubing to the blood bag. Place the other tube in a bowl or bowl. The venous system is now pressurized and full. Close the bottom pipe. Usually the arm skin is disinfected.
Prepare another IV bag filled with synthetic blood. Attach a clamp to the IV tubing. Identify a suitable vein and push the infusion needle into the vein. If blood comes back, adjust the flow rate. Allow blood to flow through the lower rubber tube into the venous system until it reaches the container or beaker.
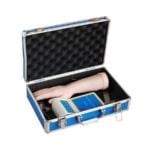
PACKAGE INCLUDED
- 1pc x Arm Model
- 1x x 5 ml Needle
- 1 xTalk Powder
- 1x Disclosure Document
- 1pcxLuxury Portable Bag
MAINTENANCE
When done, clean the model using a cleaner.
The model can be used repeatedly and can be easily changed when the vein and skin are damaged.
Store the model in a ventilated and dry place. Do not place the model in a wet place or in direct sunlight to reduce its lifespan.
WEIGHT
- Gross: 2 kg
- Net: 1.7 kg